Showing posts with label Windows tricks. Show all posts

Make XAMPP to Run automatically on start up..!!!


Latest Trick  JMinD_FreaK J
 
 This SEM  T.E students are busy with their  Mini-project of Web Designing, for this you must need to run Local host (xampp) on your systems. Every time you starts your machine you need to  find xamp shortcut then you need to start Apache server and SQL server manually by clickin on start option in Xampp.
if you want to avoid this manual settings and if you want your Xampp(localhost ) to be  start automatically on windows start up

Follow the Steps:-
1) First you need to configure your xampp setting. RUN XAMPP and follow image.


2) Now, to run any exe at the start up. Windows need to see the Run log. Exe file present in the RUN.log windows runs those files.
3) So to start Xampp. We have to make its log in RUN.
4) windows + R (i.e Open RUN) type REGEDIT >HKEY_LOCAL_MACHINE>SOFTWARE>
     MICROSOFT>WINDOWS>CURRENT VISION>RUN.


5)Now right click in window> NEW>STRING VALUE or alt+ E > NEW>STRING VALUE. it will add new file in list. name it by XAMPP.
6) Right Click on this File. Select MODIFY> in String Data field type path of xampp_start.exe
c:\xampp\xampp_start.exe > click on ok.


7) Now LOG OFF . Again on LOG ON you will find your Xampp started automatically.
8) It will now even show any xampp window running or minimized.  Check it by running  any PHP file in browser.


Computer Tricks & Tips

Error Reporting in XP..!!!


 If error reporting in XP is bugging you then turn it off

When a system error occurs in XP, a little dialog box appears asking if you want to report the error to Microsoft. Click the message box to make it disappear. You don't have to report the error if you don't want to and on today's "Call for Help" Leo shows you how to turn off the feature if you find it distracting.

To disable error reporting, follow these directions:

1. Right-click My Computer and choose Properties.
2. Click the Advanced tab on your System Properties dialog box.
3. Click the Error Reporting button on the Advanced tab.
4. Place a checkmark next to "Disable error reporting."
5. Leave the other radio button unchecked next to the text labeled, "But notify me when critical errors occur."
6. Click OK.
 
 
Enjoy 
-= MinD_FreaK =-
 

Hidden Programs In Windows XP ..!!!


Is it strange to hear , but true that some good programs are hidden in Windows XP !!!

Programs :

1. Private Character Editor :

Used for editing fonts,etc.
  Start>>Run
  Now, type eudcedit

2. Dr. Watson :

This an inbuilt windows repairing software !
start>>Run
Now, type drwtsn32

3. Media Player 5.1 :

Even if you upgrade your Media Player, you can still access your old player in case the new one fails !!!
  start>>Run
  Now, type mplay32

4. iExpress :

Used to create SetupsYou can create your own installers !
  start>>Run
  Now, type iexpress

HOW TO DO MULTIPLE LOGIN...FROM MESSENGERS..(YAHOO ; GTALK)..!!!


We can login with multiple user from same computer ...:D want to know how ..follow the step below..
(Yahoo messenger , G-talk)

1) Go to Start
2) Navigate to HKEY_CURRENT_USER-->Software-->Yahoo-->Pager-->Test
3)ON the Right side if the page , Right click and choose new Dword Value.
4) Rename it as " Plural ".
5)Double click and assign a decimal value of 1.
6) Now close registry and restar yahoo messenger and try Multiple Login

All (SHIFT + Del) Permanently deleted files Recovery solution..!!


Sometimes we delete the files permanently, and realize those files were important...


For all those folks,
Here is the solution

Software called "Kissass Undelete" , can bring those files from the hard disk or your flash drive.
 
[ Conditions : Only if the data on that drive is not re-occupied(or written). that means the space which was available after the deletion is not been occupied after the deletion.Its actually related to the node number of that file those who have attend the workshop on Booting held at ADCET (By Yogesh Babar) will get this concept...remember ?? File neva gets wipe out from your HDD, when you delete your file it just detach your file from that address we can reconver it by calling its node number]

Click Here to download the .

1)
To start searching for the files,
Select the drive from the Left panel of the Windows and Click the scan button.
the Scan might take upto 10 secs.

2)
When the files search has been completed, it will show you the results with the name, typ, size and the last modified date of the searched file.

3) Now you can select the file to be recover. This is an Open source application and available for All Windows OS(Windows XP/Vista/ 7)


Enjoy
Computer Tricks & Tips 
-= MinD_FreaK=-

Rename Multiple files in sequence..!!!


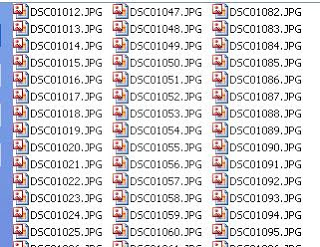
When we  download photos from our digital camera of any event suppose our college event like discovery , synergy birthday they often have unrecognizable names. we can rename several similar files at once with the following procedure. This also works for renaming other types of files.

1 ) Open the My Pictures folder. (Click Start, and then click My Pictures.) Or open another folder containing files that you want to rename.

2) Select the files you want to rename. If the files you want are not adjacent in the file list, press and hold CTRL, and then click each item to select it.

3.On the File menu, click Rename.

4.Type the new name, and then press ENTER.

       All of the files in the series will be named in sequence using the new name you type. For example, if you type Discovery , the first will be named Discovery and subsequent files in the series will be named
Discovery (1), Discovery (2), and so on. 
      To specify the starting number for the series, type the starting number in parentheses after the new file name. The files in the series will be numbered in sequence starting with the number you type. For example, if you type Discovery (10), the other files will be named Discovery (11), Discovery (12), and so on....


Enjoy
Computer Tricks and Tips 
-=MinD_FreaK=-

Use Keyboard as Mouse ...!!!!

Keyboard Mouse


If your mouse is not working and you don't wish to wait till you get a new mouse, you would definitely like to know how you can use your keyboard as your mouse. It is easy to use your mouse as keyboard in Windows using the On Screen Keyboard utility, but it is also possible to do the reverse.


All you need to do is:

Windows XP Users:-
  1. Go to Control Panel.
  2. Then click on Switch to Classic View.
  3. Then Click on Accessibility Options.
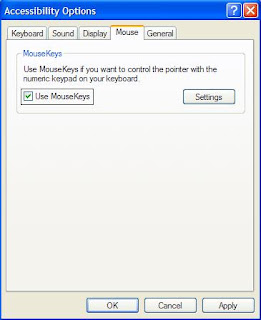
  4. Then Click on the Mouse Tab.
  5. Select Use MouseKeys.
  6. Click on OK.
  7. Then activate NumberLock (by pressing the NumLk key).
  8. You should hear a beep sound.
  9. Now you can control the mouse pointer using the arrow keys on the numeric keypad.
use keyboard as mouse


Windows 8, Windows 7 and Vista Users:

  1. Open Ease of Access Center by clicking the Start button , clicking Control Panel, clicking Ease of Access, and then clicking Ease of Access Center.
  2. Click Make the mouse easier to use.
  3. Under Control the mouse with the keyboard, select the Turn on Mouse Keys check box.

You can also increase the acceleration and speed of your mouse movements according to your needs.

You can alternately press the Alt+Shift+Num Lock combination to instantly activate the mouse keys.


Laptop Keyboard Mouse

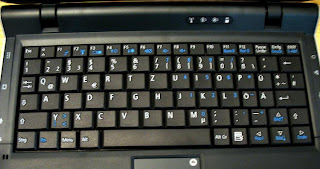
For laptops, this will only work if your laptop keyboard has a numeric keypad or alternative keys which you can enable by pressing the Number Lock Key or the Function key.

On my laptop, number 6 key of the numeric keypad moves the mouse pointer left, number 4 key moves the mouse pointer right, number 2 key moves it down, number 8 key moves the mouse pointer up, number 5 and + key serve as right click while the number 0 key works as left click.

TRICK TO SAVE YOUR TIME WHILE INSTALLING WINDOWS XP ..!!!


Installing Windows XP ..hmnn it takes so much time ..:( ..still you can reduce the installation time ..and speedup your installation and save your time :)
there is a trick hope you will like it :

  • Boot through Windows XP CD.
  • After all the files are completely loaded, you get the option to select the partition. Select “c”.
  • Now Format the partition, whether it is normal or quick with NTFS or FAT
  • Once the formatting is completed, All the setup files required for installation are copied.Restart your system by pressing Enter.Now, here begins the Simple trick to save 10-15 minutes.
  • After rebooting, you get a screen where it takes 40 minutes to complete or finalize the OS installation.
  • Now, Press SHIFT + F10 Key -> This opens command prompt.
  • Type “taskmgr” and press enter. This will open task manager.
  • Click the Process Tab, here we find a process Setup.exe. Right Click on Setup.exe and Set Priority -> Select High or Above Normal. Initially it will be Normal.

liked ??

COMPUTER TRICKS & TIPS
 

Lock a Folder With Password Using Folder Protector


Lock Folder Windows

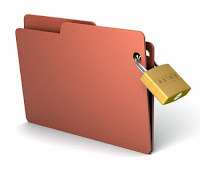
         All of us have some files and folders that we consider private. They can be anything frm our college projects, some documents , pictures of friends, family or <3 G.F's <3. These are files that we don't want other people using our computer to know about. As Windows offers no way to protect our private information, most of us get in awkward situations when these files are discovered by our friends or any unwanted people in college :P or at home .  Surely, you can store this information in a hidden folder. The only problem is that anyone can easily search the contents of a hidden folder using Windows Search itself.
        The only viable solution is storing this content in a password protected folder so that only those people knowing the password of the folder can access it. There are many folder locking programs available online but the problem is that most of the good ones are paid. Even if you do manage to get a good free one, you will be looked at suspiciously when people see a folder locker in the list of your installed programs.
        If you too find yourself in a similar situation, you can try Folder Protector, a password protector for Windows folders that is not only free but is also portable meaning that it does not need to be installed. Just click on the exe file and the program will start running.

Folder Protector:
 
         Folder Protector offers each user a protected folder that can only be opened by entering the password in FolderProtector. Unlike most security programs, Folder Protector is small in size (nearly 58KB) and does not show the folder that it is protecting. This gives an additional advantage that people who don't know the password do not have a target to try and hack their way into. As the software is portable, you can hide it or even delete it after protecting your folder and no one will have a clue that it was used. Then whenever you need to access protected files, you can re-download the program from this page, enter the password and access your protected files.

Downloads :

  1. Download for Windows 8, Windows 7 and Windows Vista
  2.  Download for Windows XP

How to use Folder Protector?
When you run Folder Protector for the first time, the program will ask you for a password that you want to use. Enter a password that you can remember as this will be the password to your protected folder.


After entering the password, the program will open a folder named SecuredFILES. This is your protected folder. You can add all your private files in this folder. This folder is located at the Desktop. After adding all your files, you may close this folder.

Then, you can use the menu in the program to lock your folder. To lock the folder, type lock as your action. After successfully locking the folder, FolderProtector will display that the folder is locked.


Unlocking the protected folder is easy. Just type unlock as your action. Then the program will ask you to enter your password. Upon successfully entering the password, the program will display the contents of your protected folder.

Changing the Password: Just type change as your action. The program will ask you for your current password. Upon successful entry of the current password, the program will ask for your new password and change it instantly.

Hide Your Files or Folders Using Command Prompt CMD...!!


Hide Your Files or Folders Using Command Prompt CMD...!!

This is most common trick now a days that many users used to hide thier confidential files or folder.
suppose You have a folder named "MY STUFF" and this folder is stored in (Disk Drive E). You think that it should not be seen by strangers who use your PC.


Now if u wanna hide this folder you need to follow the following instructions

 1).  Press windowkey+R: Run command dialog box appears.
 2).   Now type "cmd" and hit enter. A command prompt window displays.
 3).   Now type "attrib "<Folders PATH>" +s +r +h" and hit enter.


 4).  The folder "MY STUFF" will be hidden and best thing is that It cannot be viewed by any search option.

    (NOTE : To view this folder again, use the same command but replace '+' with '-' on  flags 's' 'r'and 'h')


Enjoy ..!!!!